Sunday, June 1, 2014

Homemade Soy Bean Milk


I only remember drinking fresh soy bean milk once as a kid but it was the BEST soy milk I ever tasted! My aunt was the one who made the soy milk. I have a faint memory of that day. All I know was that we had a limited amount of milk to drink. After actually making soy milk myself, I understand why! It takes A LOT of work and time; from waiting for the beans to soak, to squeezing out the freshly cooked milk! I think I only decided to make soy milk though because we usually have those soy milk boxes (similar to juice boxes except with soy milk) at our house. I didn't want to drink the soy milk boxes since they contain loads of sugar so I thought "why don't I just make my own soy milk?" My family loves it! Instead of adding white sugar, I used agave nectar. The soy milk taste so fresh and rich! :)

My aunt makes her soy bean milk using a different method which I have tried. I feel that this method has more soy bean flavor and richness!

Homemade Soy Milk
Recipe adapted from rasamalaysia.com.

Ingredients
1 1/2 lbs Non-GMO organic soy beans
7 quarts water
Sweetener to taste, optional

Directions
1. Soak soy beans overnight - 8 hours or more.
Note: change water twice a day so that the beans don't go bad. Be sure the water is clear. If the water isn't clear, then the water should be change (The water in the image below should be changed).


2. Once the beans are ready, discard the water and rinse a couple of times.


3. Remove skin of soy beans. It helps to remove the skin while rinsing the beans. It is not necessary to try to remove skin from EVERY single bean.


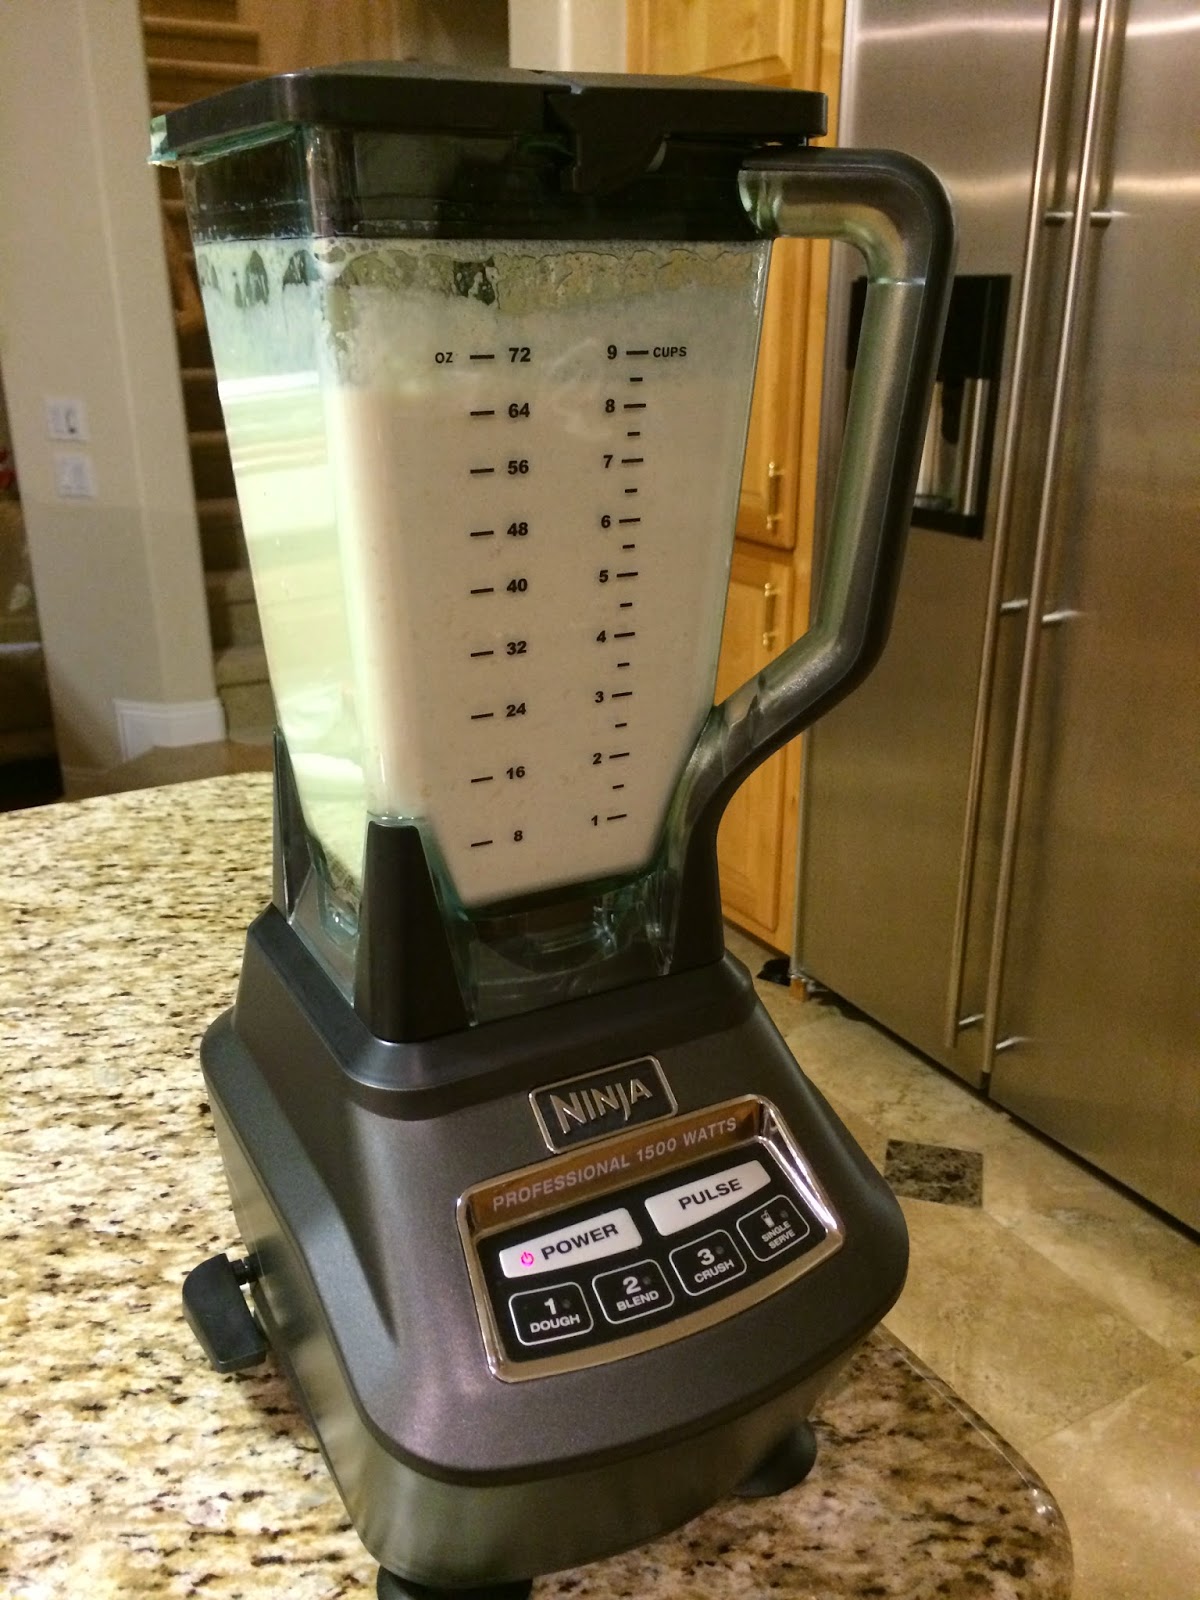
4. In a blender, add soy beans and water. Do this in multiple batches.


5. Transfer soy beans mixture into a large pot (10 quart pot since there will be foam).


6. Bring the mixture to boil on medium-high heat. Once the mixture boils, turn the heat down to medium-low. Simmer for 30-45 minutes. 


7. Turn off the heat. You may choose to drink the soy milk while warm or set aside to cool. 

8. Use a nut milk bag to strain and squeeze out the milk. 


9. Enjoy or store in the fridge once the milk is cooled (can be stored for up to 5 days).


Monday, April 28, 2014

Simple Breakfast; Eggs with Avocados and Broccoli


Most people say that breakfast is the most important meal of the day. Here is a recipe that takes less than 30 minutes to cook/prepare and taste amazing!

Ingredients:
2 eggs
Cooking spray
1/2 small avocado
1 cup broccoli

Directions:
1. Cut and wash broccoli and place into a steamer. Once the water boils, cook for 5-6 minutes.
2. Spray the skillet with cooking spray. Make sure your skillet has a lid.
3. Place two eggs into the skillet with heat on low. Cover and cook until there is a thin white layer over the egg yolks.
4. Serve with avocados or desired toppings.


Monday, March 24, 2014

Ahi (Tuna) Poke with Avocados


Recipe adapted from Tasty Kitchen, by aspicyperspective.

Ingredients:
~1lb Sashimi Grade Ahi Tuna Steak
(^I got my tuna at Costco. You can also buy it at Whole Foods or any Japanese Market)
1/2 cup white onions/1 whole shallot - thinly sliced (more if desired)
1/2 cup green onions - chopped
3 tbsp light soy sauce
1 tsp sesame oil
1 tsp garlic chili sauce/Sriracha
1 tbsp sesame seeds - optional
Avocados - Optional
Spring Mix - Optional

Directions:
1. Pat the tuna dry, then dice into small cubes. Place into a bowl.
2. Chop onion/shallots and green onions. Add into bowl with the tuna.
3. Add soy sauce, sesame oil, garlic chili sauce, and sesame seeds (if desired) into bowl with tuna and onions.
4. Mix all ingredients together. Serve right away or place into an airtight tupperware and refrigerate.

Optional:
Add avocados to tuna poke when ready to serve. Also add desired amount of garlic chili sauce/Sriracha. You can also add spring mix instead of avocados and make a tuna poke salad.

Note: Pictured above is 1 serving - 1/4 cup tuna poke, 1/2 small avocado diced.
21 day fix - 1 red container, 1 blue container

Saturday, March 8, 2014

Taro Paste Filled Coconut Milk Bread

I have been looking for a Taro filled bread recipe for the longest time but I was never able to find the right one. Taro paste is also known as Or Nee which is a Teo Chew dessert. My aunt told me that she used to make it all the time for my uncle. Of course, they are now trying to cut down on sugar but who isn't? When I first thought of making taro filled bread, I actually wanted to go to the store and just buy the filling. As always though, my aunt told me that it was "easy to make." Anything that has to do with cooking is always "easy" for her. I guess it's simply easy for my aunt because she has been cooking every day for the past 20 years so I don't blame her for thinking that. I still have about 15 more years until it's my 20 years then it will be "easy." Maybe cooking isn't so difficult but it is more time consuming than anything. When I make this bread, it takes me about 4-6 hours (including wait time). The taro paste takes the longest out of this entire recipe I would say because you have to STIR!!! My arms hurt so badly while I was stirring the taro so I would take a couple seconds of break time. I had to immediately get back to the taro paste after those few seconds since I didn't want the paste to burn.

Sorry for getting a little off track. Lets get back to the bread. The first time I ever made bread was maybe a year or so ago. I failed completely when I made the taro bread and for some reason it seemed 10x more difficult. My journey for this bread wasn't too difficult since I already knew how to make taro paste! There's a lot of taro paste recipes out there and bread recipes as well. I haven't found one that I liked though so I decided to take this coconut milk bread I made recently and add taro paste into it as a filling. I was honestly really scared that I would fail again but thankful the bread turned out perfect in my opinion. I made about 6 loaves of coconut milk bread filled with coconut flakes before I decided to make the taro filled bread. 

I must say that I am completely happy with my taro filled bread. The bread recipe I adapted from 350 Degree Oven is absolutely amazing. She has the most detailed instructions. Not once did I feel confused on what to do and to top it off the bread was extremely soft and fluffy.

My boyfriend tried the first piece of bread that I made. I don't know if he was being serious or just tricking me into trying the coconut bread. He thought that the bread was undercooked but I guess he realized it was just really soft. He's silly like that. Haha. The coconut filling did not quite satisfy me though. Maybe I didn't put enough filling or I don't like coconut as much as I think I do. 

So lets get to baking! I am so excited to share with everyone! :)

First we need to make the Tang Zhong, then the dough. While we wait for the bread to rise, we will make the taro paste filling.

(These are the brands I used for my ingredients - I really like the Trader Joe's brand coconut milk. There are no preservatives compared to the ones at the Asian Market.)

Tang Zhong
Recipe adapted from 350 Degree Oven.

Ingredients: 
1/3 cup bread flour
1 cup water

Directions: 
Place bread flour and water into a sauce pan with heat on high medium/medium. Use a whisk to mix the ingredients together over heat until there are thick swirl lines. Remove from heat and cool down.


This recipe makes 1 cup of Tang Zhong.

Coconut Milk Bread
Recipe adapted from 350 Degree Oven.

Ingredients:
1/2 cup coconut milk
1 egg
3 tbsp coconut oil
1/2 tsp salt
3 tbsp sugar
1/2 cup tang zhong
2 1/2 cups bread flour
2 tsp dry active yeast

Directions:
Combine all the wet ingredients then place the bread flour on top. Create a well in the middle of the bread flour and place your dry active yeast into the well.


Using a KitchenAid mixer (hook attachment), knead the dough for 15-20 minutes (You can also use a bread maker or knead the dough by hand).


Fill hot water into a big mixing bowl and place the mixing bowl with the dough inside the water bath. I find that the warm water helps the dough rise better.


Let the dough rise for 45 minutes, punch down, and let it rise for another 45 minutes. While waiting for the bread to rise, make the taro paste.

Taro Paste Filling - Or Nee
Recipe adapted from TheWanderingEater.

~2lbs Taro Root
2/3 cup sugar
4 tbsp coconut oil

Directions:
Peel off the skin on the taro then slice the taro into thin pieces (or cube them). Steam the taro for about 10 minutes or until tender. While the taro is steaming, place the sugar and coconut oil into a food processor. Place the steamed taro into the food processor and blend until smooth. Take the taro mixture and place it into a sauce pan to evaporate excess water from the mixture on low heat; remember to constantly stir the mixture. Remove from heat and place taro paste into another bowl to cool.

Forming the dough, making egg wash, and baking the bread
After the dough is done rising and the taro paste is cool, it is time to roll out the dough and put the bread together! This is the fun part!!!

1. Divide the dough into 8 pieces. I roll the dough into a ball to ensure that they are all even.

2. Roll the dough into an oval shape.

3. Place taro paste on top.

4. Fold the dough into thirds to cover the taro paste.
(Unfortunately, I accidentally deleted the picture. Please refer to the blog, 350degreeoven)

5. Roll out the folded dough into a rectangle then roll it up into a cylinder. Repeat steps.

6. Grease the bread pan then place the rolls into the bread pan (place the seams facing down). I did placed four rolls for every bread pan. Loosely cover the pans with saran wrap then let the dough rise for another hour.

7. While waiting for the dough to rise, make the egg wash.

Ingredients:
1 egg yolk
1 tbsp water

Directions:
Mix the ingredients together then place in the fridge.

8. Preheat the oven at 335 degree F about 10 minutes before the dough is finished rising.

9. Brush the egg wash on top of the dough and bake for 30 minutes. After the bread is done, remove and cool in the pan for 5 minutes.
 10. Remove the bread from the pan and cool on a cooling rack.

Special thanks to Mika from 350 Degree Oven for the AMAZING coconut milk bread recipe. :) Please check out her blog for more awesome recipes. 

Thursday, March 6, 2014

Spicy Turkey Chili - Mrs. Dash w/Avocado

I recently started this new beach body program called 21 Day Fix. I feel really proud that I have been keeping up with the program. The program is basically portion control combined with an every day 30 minute work out. For most days, I have eating healthy and well portioned meals. I must say that it feels amazing to feel content after a meal instead of stuffed. I feel that eating clean is something that is difficult for everyone since we are so used to all the fried foods, carbs, and fast food. I feel that we have too much good food around us and most times we don't know when to stop. It is especially difficult when the portion sizes at restaurants are way more than you can even eat. All we want to do is keep eating our meals until we finish though.

Since I started the 21 Day Fix Challenge, I also joined a support group on Facebook. We basically motivate one another as well as update our progress. In that motivational group, we also share the foods we eat and what workout we did that day. We talk about our lows and our highs. I feel that I have tried more at keeping up with the workouts and healthier eating habits since I participated more in the group on Facebook. Anyways, someone in that support group posted a chili recipe. So I went online and searched for a Mrs. Dash seasoning packets for chili. Lucky for me, that seasoning packet actually existed. The hard part was looking for the seasoning packets. I went to a couple different places but only one store had it, Smiths. I don't normally shop there but I will take what I can get!


Recipe adapted from Mrs. Dash seasoning packets

Ingredients:
~1lb ground turkey
1 can (15 oz) diced tomatoes
1 can (15 oz) tomato sauce
1 can (15 oz) black beans, undrained
1 green bell pepper
Red onions - amount desired
Tabasco sauce (amount desired/optional)
Crushed red peppers (amount desired/optional)

Directions:
Chop the green bell peppers and onions. Cook the turkey until it is browned (I used a pot so that I don't have to transfer the meat after). When the turkey is finished cooking, add tomatoes, tomato sauce, black beans, bell peppers, onions, Tabasco sauce and crushed red peppers. Bring to boil then cover and let simmer for 10 minutes.

Serve with extra Tabasco sauce if desired (I love the heat it gives). You can also serve with brown rice and avocados or add a couple pieces of blue corn tortilla chips. Yumm!

21 Day Fix containers:
Turkey Chili - 1 Red, 1 Yellow
Turkey Chili, Brown Rice, Avocados - 1 Red, 2 Yellow, 1 Blue
Turkey Chili, Tortilla Chips - 1 Red, 1 Yellow


Saturday, January 11, 2014

Brown Fried Rice with Turkey Meatballs and Spinach


I made some brown fried rice a couple days after New Year's Eve since I had leftover meatballs and brown rice sitting around in the fridge. I didn't feel like eating them separately so I decided to combined them together to make some fried rice. I was always so curious about how brown rice would taste fried rice style. After making some brown fried rice, I thought the taste was amazing. I didn't add too much soy sauce so the fried rice still tasted relatively healthy :)

I believe this was actually my second time making fried rice. The first time I ever made fried rice when when I started college. I was completely clueless on how to cook anything so my fried rice turned out being mushy. I didn't know fried rice called for leftover rice. Haha.. silly me! Well, at least I know now so it is never too late. I would say that my second time making fried rice was a successful!!

Ingredients:
Olive oil
2-3 eggs
4-5 garlic cloves - minced
~ 3.5 cups brown fried rice
2 leftover turkey meatballs - diced
2 handfuls spinach

Directions:
1. Minced garlic cloves and dice the leftover meatballs. Set aside.
2. Heat pan on medium-high. While you are waiting for the skillet to heat up, whisk your eggs together. Drizzle oil into the skillet, then pour the egg mixture in. Be sure not to over-cook your eggs or it will be too dry. When the edge of the eggs start to pop up a little, start to scramble your eggs. Set aside the scramble eggs.
3. Drizzle oil into a pan then add garlic. Saute the garlic then add brown rice. Stir-fry the brown rice for a couple of minutes until rice is heated up thoroughly.
4. Stir in desired amount of soy sauce.
5. Add leftover meatballs and spinach. Continue to stir-fry until spinach is fully cooked and meatballs are heated up (add green onions if desired).

**Note: For best results, use rice that has been previously cooked - about 2-3 days. This prevents fried rice from becoming mushy. You may also use overnight rice.

Saturday, January 4, 2014

Turkey Meatballs - New Year's Eve Dinner

Happy New Year's Everyone! 

As always, I'm a little late. A little late is better than never though they say. I feel that every year is the same. Everyone starts by writing a list of resolutions.. I guess deciding what they want to accomplish by the end of the next year. This year I didn't think about it much I guess because every year I have the same goals. I feel that New Year's isn't the only time to make a new goal but you can do that any time throughout the year. Every day is another day to better your life, your health and of course helping those around you better themselves as well. I understand that a new year signifies a new start and I agree that some people may need that. I remember two years ago, I didn't know who I was at all. I felt lost and negative. All I did before the year 2012 was go clubbing then sleep. I would also go to work of course. I had a job at school but sometimes I could barely even make it to work with my heavy drinking. I would say that my biggest influence would be my boyfriend though. Since I meant him, I feel that all I want to do is become a better me. I never met anyone who would go to the gym everyday except my mom. I guess seeing it from someone else made a difference especially if it was someone I could possibly be with almost every waking moment. I have to admit that I am still not working out as much as I want to or eating as healthy as I want but I am better than I was two years ago before I meant him. I am more positive, more healthy, more happy with life. Most importantly, I am trying to improve myself even though I was better than two years ago when I was depressed, drinking and partying all the time. This year I didn't get to celebrate New Year's Eve with my boyfriend who I felt has made me a better person. I didn't go to any huge parties or count down with people dancing around me but yet I still felt happy. I was with one of my lovely sisters and my adoring nephew but yet it was so exciting. I spent my night tickling my nephew until he laughed like there was no tomorrow. I listened to my little sister yell and scream with exciting/anger as she was playing Settlers of Catan online but I still felt so content. I also of course cooked us New Year's Eve dinner. I could never leave the food out! I wanted to try something new from the usual food I cook. New Year, new recipe right?! Hahaha. I decided to make turkey meatballs so I went on a hunt once again for another recipe! :)

I would have to say that my turkey meat balls were pretty successful. I was a little worried that the meatballs weren't cooked fully so I put them in the oven for another 5 minutes. I would say that was a bad idea on my part. The turkey meatball turned out to be a bit dry. Luckily, I had some left over marinara in the fridge so I put some on my meatballs for a moist taste! Perfect idea and delicious!


Recipe adapted by Shannons's Knits .
Yields: 12 meatballs

Ingredients:
1 lb ground turkey breast
3/4 cup chopped cilantro
3-4 cloves of garlic - minced
1/2 small yellow onion - diced
2 eggs
2 tbsp cumin
1 tbsp chili powder
1 tsp oregano
1 cup instant oatmeal

 Directions:
1. Preheat oven at 450 degrees F.
2. While waiting for the oven to preheat, chop cilantro. Mince garlic, and dice the onions.
3. Place all ingredients into a large mixing bowl and mix using your hands. Add egg whites if the ingredients do not bind together (I used a little over 1 lb of turkey so I added a little egg whites so all my ingredients would stick together).
4. Shape the ingredients into 12 balls and place into the baking dish evenly.

5. Cover the baking dish with aluminum foil to keep meat moist while cooking.

6. Place the baking dish in the oven and cook for 30 minutes or until meat is fully cooked.
7. Serve meatballs with marinara sauce or salsa and enjoy.

I ate my meatballs with marinara and a side of brown rice and asparagus.